The 15 Best Montessori Science Activities for Preschoolers

Dr. Maria Montessori viewed all children as little explorers. No wonder she introduced them to advanced scientific topics such as zoology, physics, astronomy, and botany in their early years of schooling.
In a Montessori setting, learning science is fun as children are given the freedom to experiment and exercise their curiosity.
The good news, we have 15 Montessori science activities that you can try out with your preschooler past school hours.
15 Best Science Activities for Preschoolers
1. What Dissolves In Water?

- Time Required: Short to Medium
- Sensory Skills: No
- Fine Motor Skills: No
- Math Skills: No
- Language Development: No
- Independence Level: Low to Medium (may require supervision)
- Safety Awareness: Yes
- Science Exploration: Yes
Kids love to play with water, and what better way to have some water fun than by trying out this preschool science activity.
This simple activity aims to teach your kid that there are solids that dissolve in water and others that don’t.
Start by making a worksheet where you list several items you’ll use for the experiment. Examples include salt, flour, sugar, rocks, rice, coffee beans, and cornflakes.
Pour water into several transparent plastic containers.
Make the experiment even more fun by asking your child to help or allowing them to guess whether the item on the list will dissolve or not dissolve in water.
Let your child put each item in its own container and stir the mixture.
Observe what happens and with the help of your child record the results.
2. Rain Cloud in a Jar Experiment

- Time Required: Short
- Sensory Skills: No
- Fine Motor Skills: No
- Math Skills: No
- Language Development: No
- Independence Level: Low to Medium (may require supervision)
- Safety Awareness: Yes
- Science Exploration: Yes
This science experiment helps your child learn how rain is formed from rain clouds. It’s educational and you can bet your child will have fun doing it.
What You’ll Need
- A large transparent plastic jar
- Tap water
- Blue washable watercolor
- Non-gel shaving cream
- Dropper
Instructions
- Fill your plastic jar with water to about ¾ full
- Spray the non-gel shaving cream in the jar until it forms a cloud
- Let your child use a dropper to add a few drops of food coloring to the cloud
- As they continue to add the drops, the food coloring will seep down into the water leading to a rain-like effect
Explain to your child that as the colored ink soaks into the cloud, it gets heavy such that it can’t hold the water any longer. This results in the water seeping down the jar through the air just like rain falls from the clouds and through the air.
3. Germs Spread

- Time Required: Short
- Sensory Skills: No
- Fine Motor Skills: No
- Math Skills: No
- Language Development: No
- Independence Level: Low to Medium (may require supervision)
- Safety Awareness: Yes
- Health Awareness: Yes
Are your kids always forgetting to wash their hands?
Teach them how quickly germs spread with this experiment.
Instructions
- Get several glitter colors and put them in different containers
- Ask your child to pour some lotion on their hands
- Sprinkle the different glitters on their hands and explain to them that the glitters represent germs
- Ask your kids to perform different activities as they would do on a typical day. For instance, let them do some coloring, drink water, hug their pet, or greet their friends.
- Tell them to observe what happens to the glitters.
- Ask them to clean their hands with water and soap to get rid of the glitters
Explain to your kids that just like they spread the glitters everywhere they touch, that’s the same way they spread germs when their hands are dirty. The only way to get rid of the glitters (germs) is to wash their hands with water and soap.
4. Sink or Float

- Time Required: Short
- Sensory Skills: No
- Fine Motor Skills: No
- Math Skills: No
- Language Development: No
- Independence Level: Low to Medium (may require supervision)
- Safety Awareness: Yes
- Science Exploration: Yes
The sink or float experiment is yet another water activity that is both fun and educational. Before commencing this activity, prepare a worksheet like the one shown below.

To get started, pour water into several containers. Let your child put one item at a time in the water and watch whether it sinks or floats.
Allow your child to be creative by letting them experiment with other items that aren’t on the list.
5. Color Changing Flower Experiment

- Time Required: Short
- Sensory Skills: Yes
- Fine Motor Skills: No
- Math Skills: No
- Language Development: No
- Independence Level: Low to Medium (may require supervision)
- Safety Awareness: Yes
- Science Exploration: Yes
This is the perfect science experiment for the spring season! The experiment is meant to help your child understand capillary action in plants.
Things You’ll Need
- White carnation flowers
- Several food colorings in different colors
- Several transparent cups
- Tap water
- Droppers
Instructions
- Trim the stems of your flowers
- Add some water to each of the cups
- Ask your child to put 10 drops of food coloring in the water and stir
- Let your child place the stem of one carnation flower in each of the cups with colored water
- Observe the changes to the flowers after a couple of hours
You’ll notice that the stem and petals of the white colors will change color from white to the color of the colored water
Explain to your child that flowers transport water through their roots. In cut flowers, the water is transported through capillary action where the water travels through tiny tubes in the stems to the petals.
6. Items That Melt In the Sun

- Time Required: Short to Medium
- Sensory Skills: Yes
- Fine Motor Skills: No
- Math Skills: No
- Language Development: No
- Independence Level: Low to Medium (may require supervision)
- Safety Awareness: Yes
- Science Exploration: Yes
This activity will help your child learn that solids have different melting points. This experiment is best done on a hot sunny afternoon.
Let your child choose a variety of items and place each of them in a different hole in a muffin tin. Some items that might be perfect for this experiment include:
- A marble
- A cube of cheese
- Ice cubes
- A Lego
- Butter
- crayons
- A small piece of bar soap
- A square of chocolate
- A coin
Ask your child to make predictions of items that will melt and those that won’t.
Leave the muffin tin with the items in the sun for a few minutes and record the ones that melt. Check the tin again after a few hours and note again the items that have melted. Record your results.
7. Fizzy Shells Experiment

- Time Required: Short
- Sensory Skills: Yes
- Fine Motor Skills: No
- Math Skills: No
- Language Development: No
- Independence Level: Low to Medium (may require supervision)
- Safety Awareness: Yes
- Science Exploration: Yes
This wonderful ocean themed science experiment teaches your child the importance of keeping our environment clean.
Instructions
- Fill a transparent jar with water and another one with vinegar
- Put one shell in each of the jars and leave them for a few hours
- Observe what happens to each of the shells after a few hours or a day
You’ll observe that the shell in the vinegar solution starts to fizzle and after some time, part of the shell floats in the solution. The next day you’ll notice that only half of the shell was left in the vinegar solution.
The shell in the water doesn’t change.
Explain to your child that it’s important to keep our environment and oceans clean if we want to preserve the marine life.
8. Learn Gravity
- Time Required: Short to Medium
- Sensory Skills: No
- Fine Motor Skills: No
- Math Skills: No
- Language Development: No
- Independence Level: Low to Medium (may require supervision)
- Safety Awareness: Yes
- Science Exploration: Yes
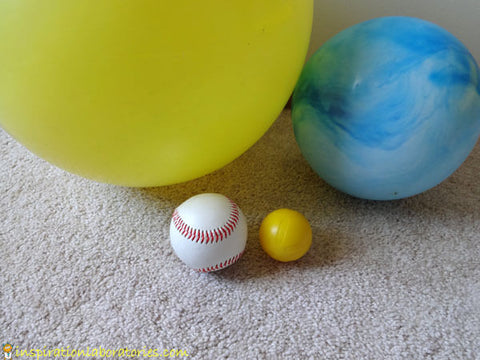
The basics of gravity can be a bit hard for small kids to grasp. Hopefully, this simple experiment will help your child observe gravity at work.
Collect balls of different sizes and weights. Ask your child to hold the balls at the same height and drop them one at a time. Ask him to predict which ball will hit the ground faster. Use a stopwatch as your child drops the balls to time the fall.
Record the results
You’ll note that all the balls took the same time to hit the ground
9. Tooth Decay Experiment
- Time Required: Short
- Sensory Skills: No
- Fine Motor Skills: No
- Math Skills: No
- Language Development: No
- Independence Level: Low to Medium (may require supervision)
- Safety Awareness: Yes
- Science Exploration: Yes
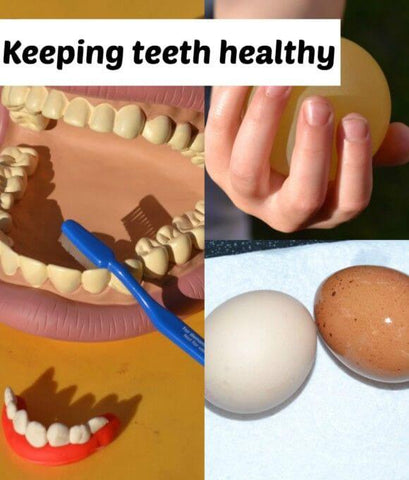
If you’re always having a hard time convincing your child to brush their teeth, try teaching them how tooth decay occurs with this experiment.
Instructions
- Pour similar amounts of vinegar, water, fizzy drink, tea, and coffee into different jars
- Add an egg with its shell to each of the jars
- Ask your child to cover one of the eggs with toothpaste and place it inside the jar with tea or coffee
- Leave the eggs for 1-3 days
- Remove the eggs from the jar
- Observe the eggs and rub the egg that was in vinegar gently
You’ll notice that when you rub the egg kept in vinegar the shell dissolves. The eggs kept in fizzy drinks, tea, and coffee all have stains while the egg covered in toothpaste has minimal to no stains.
Explain to your child that the eggshells have a similar chemical composition as the enamel on their teeth. Tea, coffee, and fizzy drinks all stain our teeth while vinegar dissolves the enamel of our teeth since it’s acidic. The only way to keep our teeth clean is to brush them with toothpaste.
10. The Walking Rainbow Experiment

- Time Required: Short to Medium
- Sensory Skills: Yes
- Fine Motor Skills: No
- Math Skills: No
- Language Development: No
- Independence Level: Low to Medium (may require supervision)
- Safety Awareness: Yes
- Science Exploration: Yes
This is an experiment you can use to explain capillary action in plants.
Instructions
- Place seven cups in a row
- Pour water into the 1st, 3rd, 5th and 7th cups until they’re ¾ full
- Add a few drops of red food coloring to the 1st and 7th cups
- Add several drops of yellow food coloring to the 3rd cup
- Add several drops of the blue coloring to the 5th cup
- Take one paper towel and cut it in half, fold it half lengthwise and fold it again lengthwise
- Place half of the folded paper towel in the 1st cup and the other half in the cup that’s next in the row. Let your child help you to do the same to another paper towel but this time, place it in the 2nd and 3rd Let them do this to other paper towels until the last one is in the 6th and 7th cups
- Watch what happens
You’ll notice that the colored water will start to travel up the paper towel and back down to the empty cup. Since the cup next to each empty cup has colored water, the two colors will mix in the empty cup.
11. Magic Milk Activity

- Time Required: Short
- Sensory Skills: Yes
- Fine Motor Skills: No
- Math Skills: No
- Language Development: No
- Independence Level: Low to Medium (may require supervision)
- Safety Awareness: Yes
- Science Exploration: Yes
Show your little one who is interested in learning about chemical reactions some magic with the help of this experiment.
Add several food colorings- red, blue, green, and yellow to a bowl of milk. Add two drops of dishwashing soap to the milk and watch the food coloring spread away from the drops of dishwashing liquid.
After a few minutes, the food coloring will start to dance and swirl on the surface of the bowl.
12. Thunderstorm Formation Experiment

- Time Required: Short to Medium
- Sensory Skills: Yes
- Fine Motor Skills: No
- Math Skills: No
- Language Development: No
- Independence Level: Low to Medium (may require supervision)
- Safety Awareness: Yes
- Science Exploration: Yes
This easy experiment aims to demonstrate how thunderstorms are formed when large amounts of warm moist air rise upwards into cold air.
- Pour some cold blue colored water into an ice cube tray and leave it in the freezer for a few hours.
- Let your child mix red food coloring in warm water
- Pour some room temperature water into a large plastic transparent container
- Pour your ice cubes at one end of the large plastic containers and the red colored warm water on the other end
- You’ll observe that the blue water sinks while the red water floats
Explain to your kid that the separation of the colors happens due to the difference in water densities. Cold water sinks while warm water rises, which is also true for air.
13. Test Items with Magnets

- Time Required: Short to Medium
- Sensory Skills: No
- Fine Motor Skills: No
- Math Skills: No
- Language Development: No
- Independence Level: Low to Medium (may require supervision)
- Safety Awareness: Yes
- Science Exploration: Yes
Kids are fascinated with magnets. In fact for this experiment, you don’t need to explain how magnets work as your preschooler will most likely have an idea.
This experiment aims to see which items are magnetic and which ones are not.
Start by gathering several objects such as:
- Coins
- Paper clips
- Plastic beads
- Pencil eraser
- Seashells
- Iron filings
- Glitters
- Keys
- Runner bands
- Wooden hearts
- Thumb tacks
- Pebbles
- Marbles
- Toothpicks
- Buttons
Ask your child to predict which items are magnetic from the list and which ones are not. Now let them use a magnetic wand to test the items.

Record the results and compare them to your child’s predictions.
14. What Absorbs Water

- Time Required: Short to Medium
- Sensory Skills: Yes
- Fine Motor Skills: No
- Math Skills: No
- Language Development: No
- Independence Level: Low to Medium (may require supervision)
- Safety Awareness: Yes
- Science Exploration: Yes
This activity is meant to teach your child that while some items absorb water, others don’t.
Make a list of items and ask your child to guess the ones they think might absorb water and which ones will not.
Here are a few items you can have on your list:
- Sock
- Sponge
- Sandwich wrap
- Paper towel
- Wax paper
- Construction paper
- Zip lock bag
- Cotton balls
- Styrofoam
- Aluminum foil
- Pebbles
Let your child drop a few drops of colored water on each of the items on the list. Record the results on your worksheet.
15. Lemon Volcano Activity

- Time Required: Short
- Sensory Skills: Yes
- Fine Motor Skills: No
- Math Skills: No
- Language Development: No
- Independence Level: Low to Medium (may require supervision)
- Safety Awareness: Yes
- Science Exploration: Yes
This fun experiment aims to show the chemical reaction between an acid (lemon juice) and a base (baking soda).
Instructions
- Have your lemons ready and roll them up to loosen the lemon juice
- Cut about a third of the lemon at the top
- Poke the inside of the cut lemon to loosen the juice
- Add different colored food coloring to the opening of each lemon and mix it up with the lemon juice
- Add a little dish soap and a tablespoon of baking soda to the mixture.
- The mixture will start fizzing due to the acid and base reaction
- Use a craft stick to mix the mixture some more
Sit back and watch the delight on your child’s face as the colorful lemons erupt.

The Benefits of Montessori Science Activities for Kids
There is no better way for kids to learn science than through the Montessori approach.
Why?
Find out below.
- The Montessori approach is hands-on- The Montessori approach allows your child to learn science through doing leading to better retention of knowledge. Besides, Montessori science activities are practical lessons in action
- Encourages creativity- Montessori science activities encourage children to try out things on their own. This approach also allows children to have fun while learning and also inspires their creativity
- Your child will develop a love for science at an early age- The Montessori science activities allow children to learn science while engaging their senses. They learn that science can be found even in the simplest tasks. This ignites your child’s desire to learn more.
- They’re fun- The Montessori science activities allow preschoolers to learn science by doing rather than reading which of course is more interesting
- They get to explore the world around them- With the help of the Montessori science activities, your preschooler will learn science and connect it to their everyday activities. For instance, when they learn about germs spread through the glitters experiment, they’ll understand how dirty hands can spread germs and the importance of hand washing.
- Tailored to your child’s needs- The Montessori science activities allow your child to learn at their own pace. Children are allowed to explore various scientific ideas and activities without the pressure of passing exams
Science in a Montessori classroom is more than just reading, it’s also about hands-on experimenting and exploring.
The above science activities are fun and educational too. They allow your child to experiment, observe, and make conclusions.
Try them out and let us know which activity is your child’s favorite in the comments section below.